Calibrate with points
Description
This widget is used for finding optimal confidence threshold of the YOLO model for specific use case (cell type, microscopy options etc.) Learn more about it at Confidence threshold calibration page.
The most reliable option is Calibrate with DAPI. However, it is based on staining your sample with fluorescent nuclei dye. If you don’t have that option, you can skip the staining and calibrate with manual annotation of nuclei.
See Calibrate with DAPI widget page to learn how calibration algorithm works behind the scenes. This widget works exactly the same way, but the role of “perfect predictor” falls on user instead of fluorescent nuclei detector.
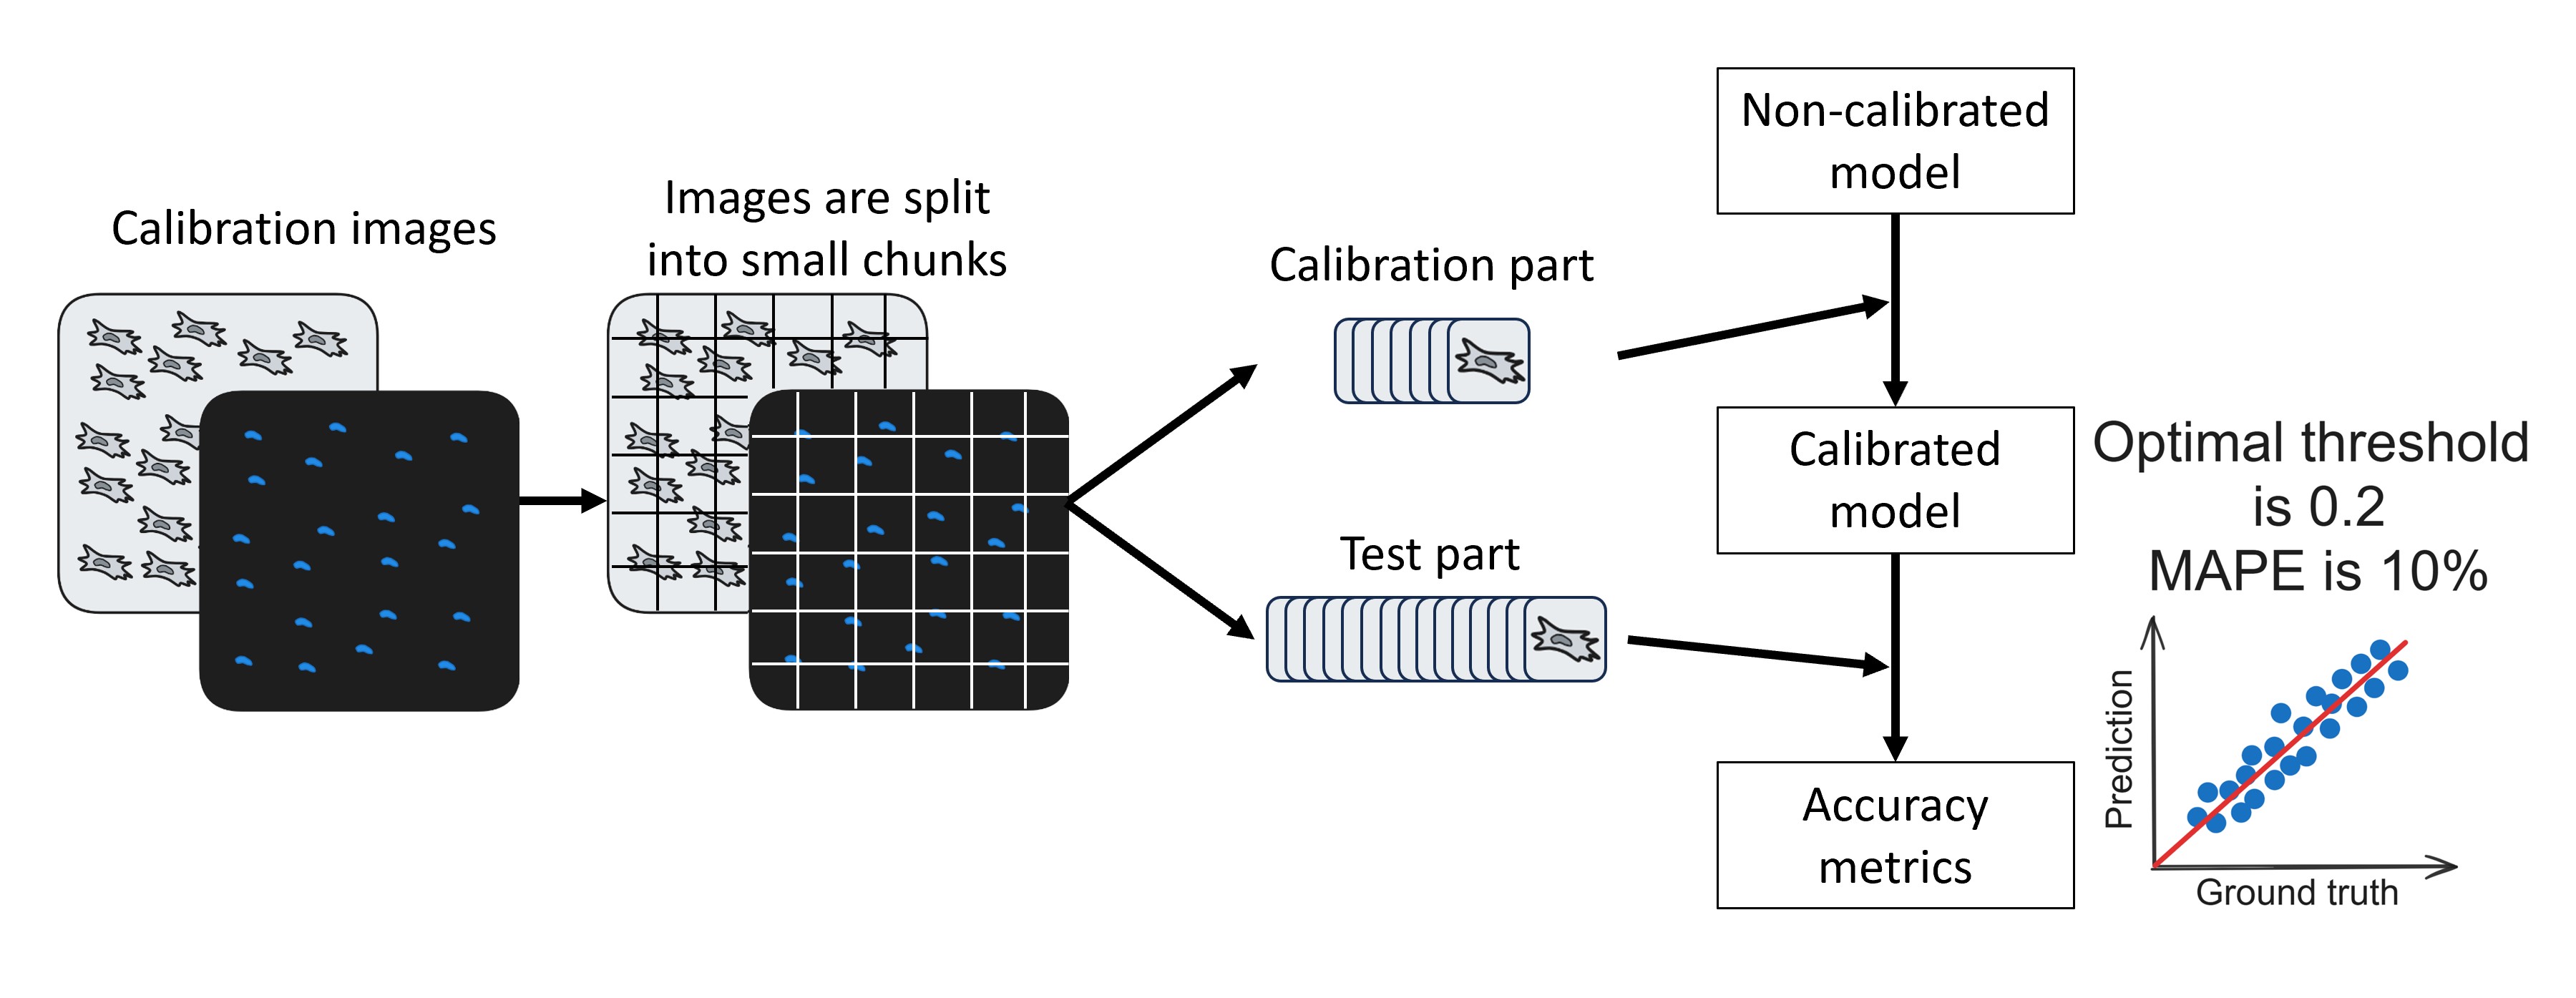
Workflow diagram of Calibrate with DAPI widget. Calibrate with points widget works the same way, but user’s manual annotations are used as ground truth instead of fluorescent nuclei.
Note
You need a large image for the use of that widget, the larger - the better. At least 6400x6400 pixels is recommended.
You need a large image for that option and Napari Points layer with marked nuclei for that image. You have two options of creating that layer:
Hint
Second option is much faster!
Manually label all the nuclei. Above the image layer icon on the left, press the New point layer button (the left one with six dots). Use Napari set of tools to label all the nuclei.
Manually correct annotations of uncalibrated model. Use Predict on single image widget with arbitrary confidence threshold and correct the result Points layer using Napari set of tools. In our practice, adding missing points is more convenient than deleting extra, so we use higher confidence threshold.

Napari set of tools to edit Points layer. Circle with plus sign inside (Second tool) is used for adding new points. Use arrow (Third tool) to select extra points (with pressed Ctrl to select several) and Delete button or Cross (First tool) to remove extra markers.
Parameters
Select Phase image field is used for selecting the brightfield image that will be used for calibration
Select points layer field is used for selecting Napari Points layer with manual annotations of nuclei (see description above for options of creating it)
Phase model is used for selecting model that will be calibrated.
Division size determines the amount of small images that your large images will be split into. It defines the size of one small image in pixels. For example, if you have an image 6400x6400 pixels, and Division size = 640, your result array will contain a 100 small images.
Calibration proportion determines which part of small images array will be used for calibration, and which part - for test. If you have an array of 100 small images and Calibration proportion = 0,1, 10 of those images will be used for calibration, 90 - for test.
Test with TTA checkbox is used for running calibration and test with TTA (test-time augmentations). Learn more at page about TTA.
Save folder is used for selecting a folder in which the calibration plot and metadata.txt files will be saved. Inside this folder, a subfolder will be created with Expereiment name.
Experiment name is used for setting up the subfolder name in Save folder for saving the results. If such folder already exists, will create another subfolder with Experiment name1 or Experiment name2 etc.
Further parameters are advanced settings. Consider changing them only if you have troubles with default ones.
Random seed is used for exact reproduction of data. The calibration and test parts are divided randomly, using the same random seed will result in the same division.
Postprocess field is a part of sliced inference parameters. It’s an optional parameter, learn more at page about sliced inference.
Match metric field is a part of sliced inference parameters. It’s an optional parameter, learn more at page about sliced inference.
Intersection threshold field is a part of sliced inference parameters. It’s an optional parameter, learn more at page about sliced inference.
Sahi size parameter determines the size of the sliding window used for sliced inference.
Important
Splitting large images into small ones and sliced inference are completely different and independent processes! For example, if you have Division size of 1280, each of your small images will be processed with sliding window of 640 pixels.
Sahi overlap field is a part of sliced inference parameters. It’s an optional parameter, learn more at page about sliced inference.